Installing PhotoGrok
Download
one of the platform specific versions from the home page. On Macintosh,
open
the dmg file and drag the PhotoGrok icon to your Applications folder.
On Windows, extract the PhotoGrok folder from the zip file. Open the
folder and double-click the icon (make a shortcut if necessary). PhotoGrok can also be launched via Java Web Start by clicking here. All versions require Java 6 or higher.
Where do I start?
Press
the "Build Tree"
icon. By default,
PhotoGrok will use the ExifTool tag "FileType" to build the tree. If
you want to see a different tree structure, open the "Tree Tags" dialog
and enter a comma-delimited list of ExifTool tags. If you want to
see a tree by Lens and ISO, enter "LensID,ISO", press "OK" and then
press the "Build Tree" tool bar button. Expand the tree to drill down
to the images. Clicking on the image will display a preview and
detailed EXIF information. Right-click on images and tree nodes to
reveal additional functions.
The EXIF-organized
tree view is built based on the following:
- File Locations Defined In "Folder Manager" (Defaults to 'Picture' folder in user's home directory)
- Comma-Delimited EXIF Tags Entered In "Tree Tags" (Default is
FileType)
- Filter Defined in "Filters" (Optional)
- File extensions defined in "Preferences" (leave empty for all supported extensions)
Does PhotoGrok alter my images or existing Exif information in any way?
PhotoGrok never alters or moves your original images. In version 2.09, a feature was added to allow the user to update the "keywords" tag in images (called "Tags"in Picasa). Since this calls an ExifTool write operation, the feature must be activated in Preferences. The author of ExifTool strongly urges users to keep backups of their images before editing. See the ExifTool web site for more information.
Does PhotoGrok work with RAW files?
Yes.
By default, when looking at raw files you're
seeing the preview image embedded in the file (extracted by ExifTool).
It's possible to configure PhotoGrok to view RAW files using
GraphicsMagick and dcraw. See below.
How do I create an catalog database for faster processing?
By default, ExifTool must read through your files one by one and this takes time. Alternately, you can use a catalog database. To build a database, configure your image directories and the file extensions you want included. Next, use the "Catalog Manager" button (the globe icon) to create the catalog. This can take time for large collections. Once the database is built, use the "Build Tree from Catalog" for quick results.
The "Clear Catalog" check box on the Catalog Manager dialog will clear the current catalog before adding new images. When building a catalog, the current folders in the Folder Manager are scanned and the results are added to the existing catalog. If any Folder Manager folders are already in the existing catalog, the catalog will be updated to reflect any changes. Cached thumbnails are also updated or deleted if necessary.
Since version 2.18, it is possible to apply the current filters to the catalog creation process. Check "Apply Filters" and the resulting catalog will contain only images that passed the existing filter set. One might use this to create a catalog for specific cameras for example. It's also possible (since 2.18) to create multiple catalogs in Preferences. All PhotoGrok catalog operations work against the currently selected catalog.I want the tree to reflect the date the image was taken. How?
Let's say you want a tree with a heirarchy based on your image's
time of creation broken down by year, month and day. For any ExifTool tag that represents a
date/time (like DateTimeOriginal), you can use PhotoGrok's date
formatting. When entering the tag, end with parenthesis containing the
desired date/time format. For example:
DateTimeOriginal(yyyy-MM-dd)
Use the formatting rules corresponding to Java's SimpleDateFormat.
See here.
Another example: DateTimeOriginal(EEEE)
will display the tree with images categorized by the day of the week
they were taken (Monday, Tuesday, etc).
Since PhotoGrok allows you to enter the same tag multiple times when
building a heirarchy you can use date formatting to create a tree with
each part of the date at a different level in the heirarchy. A common
example might be year at the top level, month below and day at the
lowest level. Enter the following comma-delimited string of tags to
achieve this:
DateTimeOriginal(yyyy),DateTimeOriginal(MM),DateTimeOriginal(dd)
How Can I Use Javascript Expressions in Filters?
Any Javascript expression that evaluates to true or false can be used in a Filter. Complex expressions can be constructed by adding multiple Javascript filters. For example, to see all images taken between F2.0 and F4.0, type 'Aperture' into the first filter field, select "Javascript Expression" as the filter operation and enter "Aperture >= 2.0 && Aperture <= 4.0" into the third field. Javascript regular expressions also work.
Find all portrait shaped images taken on a Sunday with an aperture larger than f5.6
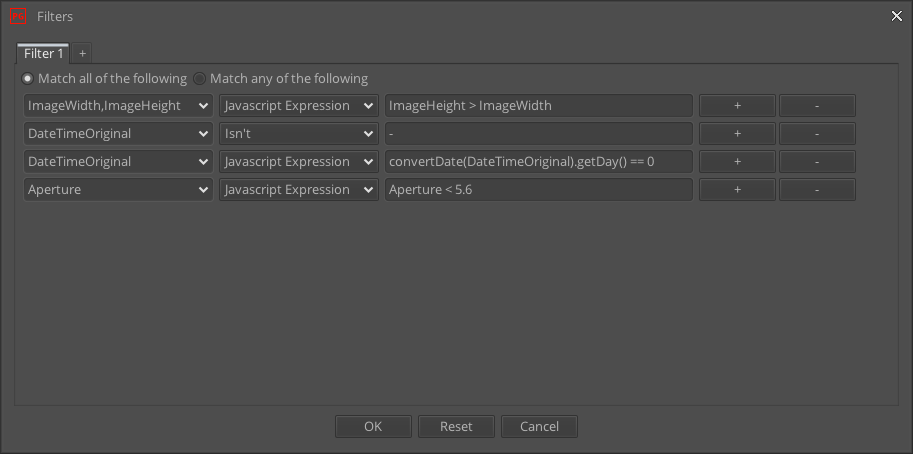
Other Examples:
Find shutter speed < 1/1000 using the new "dec" helper function ("dec" converts ShutterSpeed to a decimal value):
dec(ShutterSpeed) < .001
Find focal length > 150mm. FocalLength is returned from ExifTool in the following format: "155.0 mm". We must remove the " mm" to do the comparison.
parseInt(FocalLength) > 150.0
Show all images taken on this day in the past. This requires two expressions with "Match all of the following" checked. The first test guarantees the second Javascript expression doesn't fail if the image has no DateTimeOriginal tag.
DateTimeOriginal Isn't -
and
var n = new Date();var d=convertDate(DateTimeOriginal);d.getDate() == n.getDate() && d.getMonth() == n.getMonth()
Can I back up images from the tree?
Right-click on a folder or root node of the tree and select "Copy
Tree" from the popup-menu. Choose a destination directory in the resulting
file dialog to start the copy process.
Directories will be created to match the tree structure and all
corresponding files will be copied into the appropriate folders.
PhotoGrok will skip duplicate files (same name and size). In the
case where the file name is the same but the size is different, a "_1",
"_2" etc.
will be appended to the copied file's name (the file's extension will
be maintained). Any characters in the ExifTool-derived folder names
that are not legal filesystem characters will be encoded to legal
characters (most commonly the '/' character).
This is useful if you need to backup or organize existing images based on their ExifTags. For example, copy all images for a specific camera model for archival purposes. Please note the original images/files are not moved or modified in any way.
How is "Copy Tree" different from Export?Instead of copying the original files, Export converts the copy to the pixel dimensions specified in the Preferences screen and outputs a jpeg file (aspect ratio will be maintained within the dimensions). There is also an option to exclude EXIF data from the exported image(s). This is useful if you want to create an image for public use and do not want any revealing EXIF info to remain.
How do I create an M3U file?
PhotoGrok can create m3u playlist files for programs like Windows Media Player or DLNA servers. Right-click on a folder node in the tree and select "Create Playlist". You will be prompted for a location to save the m3u file. You will then be asked whether to save the file with absolute or relative paths. Relative paths are useful if you plan to move the playlist and corresponding files to another storage device like a USB or DVD. As long as the moved files maintain the same relative location to the playlist, it won't matter what drive letter or mount point is used.
How do I use charting?
Let's say you want to see a visual breakdown of how often you used different cameras or lenses in your image collection. First create a meaningful tree (maybe by tags "Model" or "LensModel") and then right-click on any relevant folder node and select "chart". Select "Pie" or "Bar" for the desired chart.
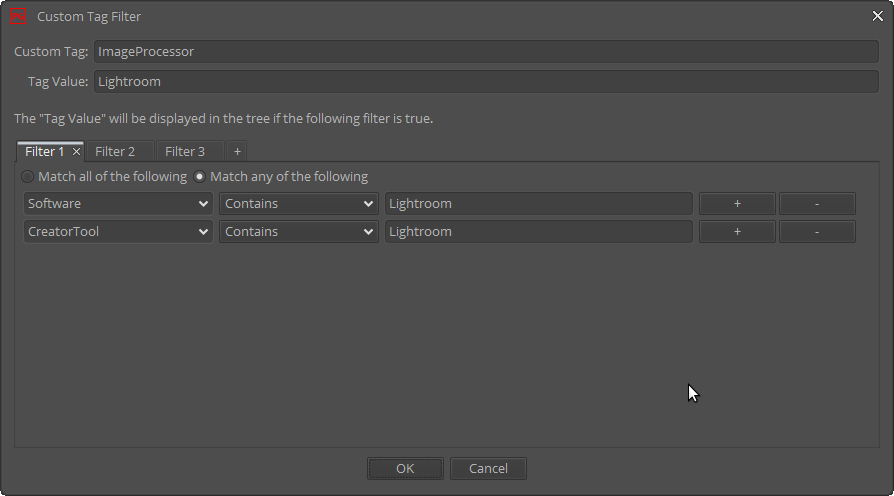
What are custom tags?
Custom tags allow you to build a tree with tags based on other EXIF data.
Here's an example. The program that creates a jpeg image is often saved in either the "Software" or "Creator Tool" tag (depending on the program and/or version). If you want to combine the two tags for a more logical grouping in the tree, you can create a custom tag like "ImageProcessor". Open the "Custom Tag Manager" and press the plus icon to create a new custom tag. For "Custom Tag", enter "ImageProcessor". For the corresponding "Tag Value" enter "Lightroom". There can be multiple tag values for a single custom tag ("Photoshop", "Silkypix", etc). In this example, enter a filter that will return true if Lightroom was used to process the photo. I have "Software Contains Lightroom" and "CreatorTool Contains Lightroom" (Lightroom uses different tags between various versions). Do this for each program you want to appear under the "ImageProcessor" tree node. Press 'OK' to save your changes. Now you can use the "ImageProcessor" tag like any other ExifTool tag.
You can also use custom tags to modify the tree for existing ExifTool tags. For example, enter "ISO" as your Custom Tag and then make a tag value of "ISO > 800" with a corresponding filter (using a javascript expression). If you then build a tree with the ISO tag, you will see ISOs as separate nodes except for images with ISO > 800. These will all be grouped together under the newly created tag.
Right-click on the tree nodes in the "Custom Tree Tag Manager" dialog to edit or delete specific tag values.
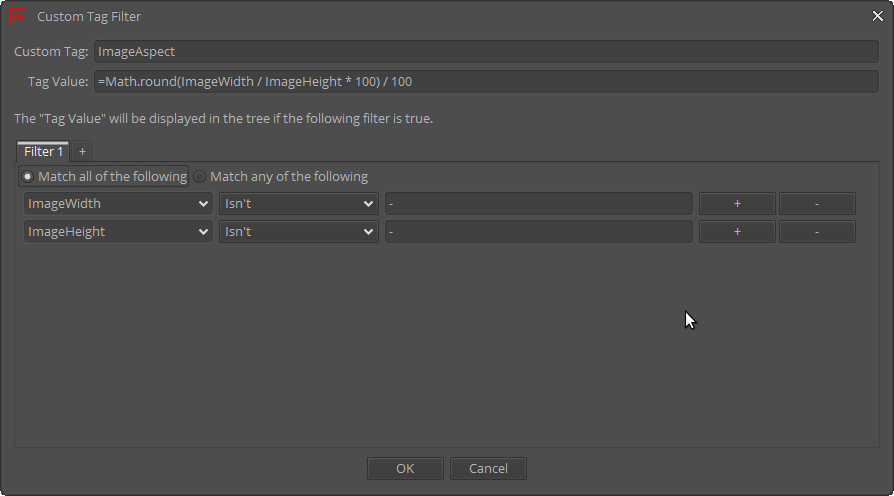
Starting with version 2.11, you can use javascript expressions to "calculate" tree labels. If you begin the "Tag Value" with an '=' sign, PhotoGrok will interpret the value as a javascript expression. Make sure any ExifTool tag variables you use are included in the filter or it won't work.
How do I uninstall PhotoGrok?
For web start, run the following command: "javaws -viewer" (javaws must be in your path). Open the Java Cache Viewer via the "View" button for "Temporary Internet Files". You will see a list of all Java Webstart applications installed on your computer. There will be an option to delete PhotoGrok from this list.
The Mac and Window versions can be removed by deleting the Photogrok icon and folder respectively.
For all versions, you also need to manually remove the .photogrok folder from your home directory (note the period prefix). This "hidden" folder contains your saved preferences and thumbnail images. Users should also delete the non-hidden "photogrok" folder in their home directory. This directory contains the bundled ExifTool files which are no longer needed.
Using GraphicsMagick to view SVG, PICT, PDF and other file types.
Install the popular program GraphicsMagick. Make sure the the gm.exe program is in the system path. This usually happens by default when installing the program but you may need to add it yourself if you compiled the program for your OS. Next, enter the ExifTool file types you would like GraphicsMagick to decode on the PhotoGrok Preferences screen. That's it.
Using GraphicsMagick to view RAW images.
To view RAW images directly (instead of the preview image), you must obtain a copy of dcraw for your os. Make sure it's located in your system's path. Next, find the GraphicsMagick delegates.mgk file. It's usually in the GraphicsMagick config directory. You need to add the correct delegate info for the RAW format you want dcraw to decode.
The format of the delegate tag can vary between versions/systems when using GraphicsMagick. Be sure to read the documentation and test thoroughly. This typically works: open the GraphicsMagick delegates.mgk file. Find the line referencing dcraw. If it looks like this:
<delegate decode="dcraw" command='"dcraw" -c -w "%i" > "%o"' />
Add a line just like it with the decode attribute edited to reflect the RAW extension you want dcraw to decode. For Canon CRW files, add:
<delegate decode="crw" command='"dcraw" -c -w "%i" > "%o"' />
Once you've added the lines for all the RAW extensions you want to view, open PhotoGrok's Preferences screen and add the corresponding ExifTool file types to the "GraphicsMagick File Type(s)" field. Separate the list with commas: SVT,TIFF,RW2,ORF,CRW
I have some suggestions. Can you
implement them?
Sure. If
there's something you'd like to see just let me know. My e-mail address
is bradgrier@cox.net.